All posts

Titles only · Full posts
  1. DIY server rack

    Many homelabs take advantage of SFF PCs because they are plentiful and don’t take up space, but I have a bunch of micro-ATX motherboards sitting around. As I continued to fiddle with my homelab, it quickly became apparent that keeping a server just standing on the floor, with network cables snaking hither and thither, was not a great idea.

    When I was getting started, I had splurged a bit and bought a 2U case. Because, you know, racks are cool, and relatively affordable on Amazon. Despite being completely excessive for what I’m doing, I suppose I thought that’s where I was going.

    Shortly thereafter I was laid off from work, and purchases like that became hard to justify.

    Fear not, though, because I’m fortunate enough to have a garage, tools, and some scrap wood lying around. I briefly considered buying just server mounting rails, but my mindset had flipped. Gonna DIY something, might as well go all the way.

    There are plenty of DIY racks made out of 2x4s out there to see, alongside the venerable Lack rack. I considered that, but then noticed the salvaged wooden bedframe I’d nabbed a while ago. (Everybody has a voice that says “That looks like it might come in handy one day” and grabs stuff off the side of the road on garbage day, right?)

    The nice thing is racks use standardized dimensions and units, so I didn’t even bother making a plan in Sketchup as I usually do. Isn’t this just 4 posts with some connecting framing? Sure it is.

    I also didn’t really take photos as I was improvising this, as I wasn’t sure entirely it would come together. Sorry if this is hard to follow.

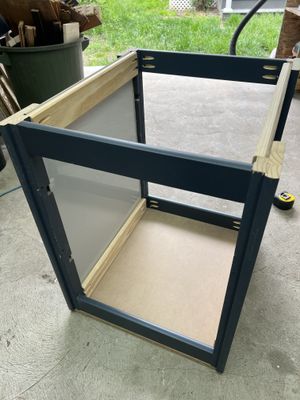
    A DIY server rack made out of scrap wood on the concrete floor of a garage

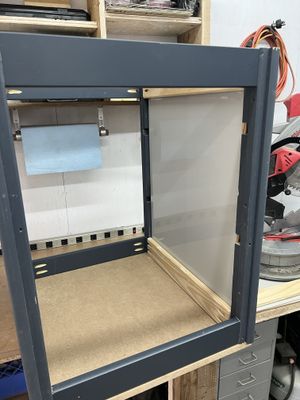
    Pocket holes in those ~1"x4" cross pieces along both width and depth are plenty sturdy enough. The semi-glossy side piece is taken from an old Ikea cabinet door and neatly hides everything.

    The same server rack as above sitting on a workbench

    I used some scrap 3/4" MDF as a top and bottom. I screwed in from the bottom to attach it, but used my air nailer to drive 1 1/2" brad nails from the top to keep the holes less noticeable.

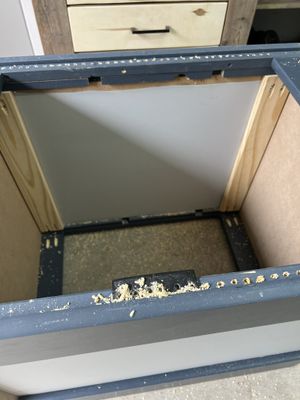
    A closeup of the server rack side, showing mounting holes being drilled

    The bedrails already had a nice inset which would allow server mounting holes to be drilled, so I 3D printed a small template to reflect the standard hole spacing racks use.

    Here is where my DIY mindset meets my impatience. I actually have a drill press, so could have done a “proper” job with this. But that would take time. (Surprise, the tension between “I don’t care that much, just make it functional and get it out the door” and “focus on craft; if it’s worth doing it’s worth doing well” shows up everywhere.) I ended up drilling these by hand, which means that many holes aren’t aligned perfectly and don’t go through at a perfect 90° angle. But it’s wood, which is a bit more forgiving.

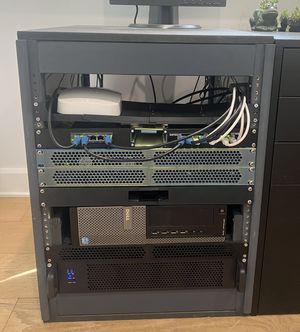
    A closeup of the server rack, filled with various servers, networking devices, and ethernet cables running

    Here’s the result as of summer 2025.

    I also had some scrap paint lying around, so I threw that on too. I 3D printed some 1U blanks, mounting brackets for various networking pieces, some little cable management thingies (could do better here), and a shelf (which is clearly not cutting it). These are just beefier lag bolts or similar holding the equipment in. I don’t need casters, as this is light enough to drag for the rare times I need access to the back.

    The nice thing about this being wood is — Need a shelf? Make one out of scrap. Need to support the back of a heavy server? Screw something in.

    Airflow seems fine so far, and this is 12U so I have room to reorganize or expand. (I don’t really foresee needing to, but isn’t more fiddling the point of a homelab? Like, yes, I agree with you, I need a UPS in here obviously.)

    Also, you can just make out that this ended up almost exactly the same height as my Ikea Alex drawer unit, so I have a nice additional work surface as well.

    A win all around!


    Addendum: As of today, I still have some of these materials lying around. If you’re in the Toronto area and silly like me interested in something similar, let me know and I can probably hook you up. 🤓🛠️

  2. Obsidian as blog admin

    As I’m fiddling with my homelab and trying to post more here, it occurred to me to see if Obsidian can be used as a lightweight blog admin frontend to remove some friction. This entire site is code I can work with, but oddly seeing writing in my editor is a disjoint — I keep fighting with linting, autocomplete, syntax highlighting, etc and I don’t want/need to.

    Obsidian Sync exists if you want no friction and to support the team financially to boot. But if that’s not a fit and you have a similar setup to mine – your blog uses a Markdown-based static site generator, is a repo checked out on your local machine, and you publish with git commit – it turns out getting started was pretty straightforward. These instructions are a bit specific to Eleventy but the principles should be similar for other engines. (This is not a new idea, BTW; others have posted similar things elsewhere.)

    Create vault

    First, create a new vault in Obsidian. Open the vault menu and choose Manage vaults. Don’t create a new vault from scratch, but instead Open folder as vault and select the root folder of your blog’s repo (eg mine is ~/code/dieter.ca). This will create a new vault using that folder’s name, and should open and display your repo’s files in Obsidian’s file tree navigator.

    This will also create a new hidden .obsidian folder in your blog repo, where Obsidian will store its config. Add that to your repo’s .gitignore if you don’t want to commit it.

    Basic config

    Since this vault is just for writing posts and each vault has its own config, you can now set up Obsidian for just that usecase (on top of whatever you like for themes, core settings, hotkeys, etc). Things I set:

    • Turn on spellchecking. In other vaults I dislike it, but it’s helpful here.
    • Turn off most core plugins. I really only need Command palette, File recovery, Files, Quick switcher, and Search. But of course you have all community plugins at your disposal to build the blog admin of your dreams.
    • In Settings > Files and links >
      • In Excluded files, add any repo directories you don’t want Obsidian to see. For example, I added node_modules because IIRC Obsidian would show any Markdown files from there in search results.
      • You probably want to point Obsidian to the subdirectory of your repo where new notes should go. For me this is /content/posts. Set Default location for new notes (In the folder specified below) and Folder to create new notes in (content/notes)
      • Turn off Use Wikilinks (see below)

    Run your local SSG server however you do (npm run start for me). Then you can go cmd-n in Obsidian and give it a filename and some content. That should create a file where your SSG expects it, your server will rebuild if it does hot-reloading, and you can see that new post in your browser. Nice! (If you type more content, you’ll see your server dutifully reloading every few keystrokes as Obsidian auto-saves. Thanks for workin’ so hard lil’ buddy.)

    Blogging config

    We can improve this a bit with templates.

    We first need to create a directory for Obsidian to store templates in. This needs to be in the vault/repo so I created an _obs directory (IIRC it won’t see anything in the .obsidian directory).

    Obsidian has a built-in templates plugin, but we’ll need some features that the Templater community plugin provides, so install that instead and disable the former.

    Then we can make a template to use when creating new blog posts. The nice thing about both Obsidian and 11ty using YAML frontmatter is we can have a setup that makes both happy. Here’s my new post template:

    <%*
    let title = tp.file.title
    if (title.startsWith("Untitled")) {
      title = await tp.system.prompt("Title");
    }
    await tp.file.rename(title)
    -%>
    ---
    title: <% title %>
    description:
    date: <% tp.date.now("YYYY-MM-DD") %>
    tags:
    draft: true
    ---
    

    The javascript at the beginning makes Obsidian open a dialog to prompt for a title, and then renames the file accordingly. Then you can put whatever YAML you need for your blogging setup, and take advantage of Templater features to fill in or calculate whatever, as I’m doing with date. I also set draft true by default, which allows me to see this locally but prevents accidentally publishing WIP on the deployed build.

    Then, in Templater settings:

    • Point its Template folder location to whatever you made above
    • Enable Trigger Templater on new file creation
    • Enable Enable folder templates and click Add new template
    • Set the folder to wherever your posts go (content/posts for me) and select the template you created (_obs/templates/Blog post.md for me)

    You should now be able to cmd-n in Obsidian again, but this time get prompted for a title — if I enter “Hello world”, I end up with content/posts/Hello world.md and Obsidian gives me a blank page. Now just type your post!

    With the SSG YAML above displayed as Properties, we have nice UI widgets to enter data, and can use things like the Tags view in the sidebar to see all tags used across the site.

    Depending on how your SSG templates are set up, you may want/need to fiddle further. For example, I turned off Obsidian’s “Show inline title” setting because my templates use the title property instead of me needing to put # Hello world in the markdown itself.

    Publish

    For now I still pop into a terminal to publish. The Hello world.md file is sitting untracked. If it’s good to go, I simply:

    git add content/posts/Hello world.md
    git ci -m "Publish post"
    git push

    (I do all that against main instead of creating a branch, bc yolo.)

    This is a bit manual, but it’s fast and has the benefit of decoupling writing from publishing. I can create new post(s) arbitrarily and stub them in, and then just leave them untracked for later. So long as I’m careful not to use git add . I won’t commit/publish them accidentally, and the draft prop is an extra safeguard.

    Enhancements

    This is a very workable system for now, but below are a couple other things to consider.

    Publishing: Theoretically I could also use a Templater user script to keep everything inside Obsidian. I’ll punt that to the maybe-later pile.

    Additional post types: Right now this just handles blog posts upon cmd-n. It’s easy to extend this to create other types of pages (eg maybe a regular non-blog page, or a specific type of blog post with preset tags). That would involve creating additional templates, handling the default new note location, and then using the QuickAdd plugin to create named processes and assign them to a hotkey.

    Images: For my current setup, including images is a teensy bit clunky. I need to add images by entering a string like <img eleventy:widths="[widths]" src="[path]" alt="[text]" /> into markdown. I created another template to make inserting that easy, and set Obsidian’s location for new attachments to a different directory (content/images).

    Filenames: If you don’t like the new file being named directly from the title you enter — maybe you want to specify your a different filename, or munge it to hello-world-<whatever>.md — then you’ll want to fiddle with the title handling js in the template.

    Linking: Right now if you type [[ you’ll get Obsidian’s file autocomplete popup to pick what to link to. With “Use Wikilinks” enabled, that will net you [[Hello world]], which isn’t parseable and will output as-is. With that disabled, you get [Hello world](Hello%20world.md). This does work for me in the built HTML output, because of the InputPath to URL plugin added in Eleventy 3.0.0. But what might be preferable in the source Markdown is [Hello world](/hello-world/). There are a bunch of ways to think about or handle this, I’m not doing anything with Obsidian backlinking or plugins, URL setups may intersect 11ty’s permalink prop or other internals, and webserver rewriting (Pretty URLs for Netlify) is also in here somewhere. I’m leaving as-is for now.
  3. Homelab, summer 2025

    Picking up from the prelude, here’s where my homelab is at as of late summer 2025.

    Hardware

    The donated server motherboards I have are SuperMicro X10SLM-F or X9SCL±F. They each have a 4-core Intel Xeon E3-1231 3.4GHz processor, and 32GB of DDR3 RAM. I also got a handful of misc 500GB - 2TB Western Digital hard disks.

    These are now dated such that that I get they’re no longer beefy enough to run a modern colo business from, so it makes sense to decommission them. And this was a generous donation to be sure; I feel very fortunate to have this stuff.

    But on the other hand, it is driving me absolutely bonkers that the economies of scale are such that it was probably not worth the colo owner’s time to try and sell these boards. I needed to buy a 2U case, a power supply, and 4 quiet Noctua fans to use them. For the same price as those parts you can find whole servers in your local marketplace app. So you don’t even need the donation.

    This is a weird and disappointing window, where we are drowning in hardware that is perfectly usable and complete overkill for my usecase, but the previous owner was somehow rational in saying “meh, i was gonna toss em, you can have em if you want”.

    My product and design brain is chewing on what kind of opportunity this presents, but we’re here to nerd out about homelab stuff.

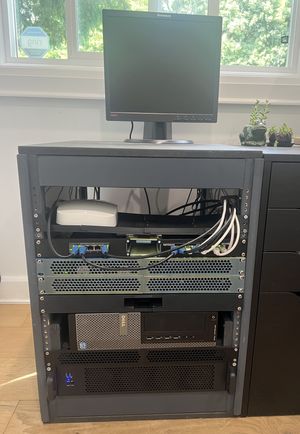
    Here’s my current setup, sitting just to the left of my desk in my office. With the above-mentioned fans it’s not noisy or distracting at all. I can hear a slight hum, about equivalent to the sound of crickets/wind/traffic coming through that window. And of course I love das blinkenlights.

    A homemade server rack holding several servers, networking equipment, and an old monitor on top. The rack sits beside office desk storage, and in front of a window with visible trees outside

    Top to bottom:

    • Retro ThinkCentre monitor (found at the side of the road)
    • Eero Pro 6E mesh wifi router (hardwired Cat6 into house)
    • 5- and 8-port Netgear switches
    • Frankenbox
    • Empty spot where a Raspberry Pi Zero 2 W used to be (moved it indoors)
    • Backup server
    • Blank
    • Main server

    Feel free to poke fun at my good-enough-for-now cable management, and the 3D printed shelf that’s not quite cutting it.

    To keep this short, I’ll put details on the other servers and networking into separate posts, coming soon. Here are details on the rack.

    Operating system

    After briefly considering doing everything bare-metal on top of Debian, I landed on installing Proxmox VE.

    This is also somewhat ridiculous, as Proxmox is full of enterprise IT deployment features. The words “datacenter”, “cluster”, “distributed storage”, and “high availability failover” belong nowhere near what I’m doing.

    But, you can just ignore all that. Proxmox was quite simple to install and get started with, and it makes spinning up VMs trivial to do. It also gives nice overviews of network and hardware utilization, and makes managing disks easier (I bought a 240GB SSD for Proxmox to live on, and configured 4 x 1TB drives into a 2.8TB RAID).

    Services

    I’ll spare you the details on my entire config (happy to share, though) and just summarize what I’m running at the moment.

    Split across several VMs (each running Debian, with Docker and Portainer for easy installation and management) I have:

    • Docmost — Wiki/document sharing
    • Forgejo — Project/issue tracker (not git hosting yet)
    • Opengist — Snippet storage
    • MinifluxRSS feed aggregator/reader
    • Jellyfin — Media server
    • Mafl — Dashboard
    • Calibre — E-book management
    • Radicale — Contact & calendar management
    • Home Assistant — Smart home stuff (not really using)
    • Raw SMB share to mount storage in Finder
    • I briefly ran an LLM server with Ollama (worked fine as a POC, but inside an underpowered VM was of limited utility)

    Thoughts so far

    I’ve been chipping away at this, very much on the side as a series of projects that occasionally drop off my radar, for probably a little over a year.

    I’m not fully running off this yet. There’s more I want to do before it’s usable and I feel confident, and I have a bunch of stuff to migrate and/or organize. But it’s getting very close to that point.

    My takeaways so far, FWIW:

    This has been 90% really fun. It’s great to be learning new skills, and reconnecting to and leveraging old ones. If only for the renewed sense of empowerment and possibility, it has been very worth it.

    The remaining 10% is my awareness that I am, essentially, voluntarily acting a devops and network engineer, two whole entire separate jobs that most people consider work, for “fun”. It does occasionally feel like why am I cosplaying as a sysadmin? Why am I doing more work in my spare time? Why am I staring at a screen and a missing semicolon again? Maybe go outside for a bit? I am reminded that past this proof-of-concept point, there is not just work but risk and obligation. The idea of self-hosting feels empowering, if not rebellious, but to do it for realz involves a lot more thought. This is probably a whole other post, but in the meantime, Drew Lyton’s The Future is NOT Self-Hosted is full of good things to consider.

    But I’m not going to let that stop me, so don’t let it stop you either. If you have some coding or command-line experience and can follow a decently-written “how to install x on y” article, then grab whatever spare bit of cheap or legacy hardware you can get your hands on and get started.

  4. Homelab prelude

    My first official job at the beginning of my tech career (late 90s) was working in-house at a small print shop. First and foremost this allowed me to keep teaching myself graphic design. But because I had also been learning early Internet technical stuff, a couple of other things ended up happening.

    The first is that I bolted PHP/MySQL onto my knowledge of HTML & CSS. I ended up building an online ordering system to allow customers to reorder business cards dynamically — just plunk name, title, phone number, etc into a form and off we went, since the cards were already designed. (The admin I built was pretty neat, because it could handle capturing arbitrary data for more than one company or card design. This was around the same time as, and I was unaware of, the launch of Vistaprint. In an alternate timeline, we kept going, out startup’d them somehow, and made a bajillion dollars. Instead I discovered that spaghetti code is bad, and learned Django.)

    The other is that I became the quasi-sysadmin for the company. I maintained not only the VPS that ran that system, acquiring the other two letters in the LAMP stack (shoutout if you’re a designer, but have also compiled memcache from source for some reason) but also a small LAN with two fileservers, a couple of beefy Xerox digital printers, and a handful of workstations.

    Over the next (ugh, how) two decades my knowledge of the inner workings of software has come in very handy. I migrated from print to product designer and from there up the management track, but I’ve always loved the frontend and engineering in general. (I of course still love graphic design, typography, and brand too.)

    My knowledge of Linux and systems administration, on the other hand, has lain somewhat dormant. I mean, I’m still ride-or-die with vim, and once spent a few months trying do everything only via the command line (shoutout if you’re a designer but have also read and sent mail with mutt for some reason). But it was somewhere after having kids and also losing a full day trying to get X11 to see my right mouse button where the “only free if your time has no value” catchphrase entered the chat.

    Anywho, fast forward to the present, where two things are now true.

    One is that nearly every piece of software around us is, in a nutshell, bad. If you’re reading this, I doubt I need to elaborate. Using n now-hideously-bloated products, all run by skeevy techbros who are flailing about trying to lock me in, extract my data, win a stupid platform war, steal my precious attention, and shoehorn magic-sparkle-AI everywhere in a desperate hail-mary attempt to keep printing more money is infuriating, and now well past the point of parody.

    The other thing is a few years ago my wife founded a non-profit in the education space, and got generously donated a bunch of decommissioned server motherboards and hard disks from someone who runs a small colo. They sat in the closet for a while, waiting for the kids to be interested. But they never did, so she ended giving me a few.

    You, uh, see where this is going, right?

  5. Hello world

    You know how some people have that thing where they struggle to start writing in a brand new notebook? Like there’s a weird kind of friction, making that first mark. “Every act of creation is first of all an act of destruction” and all that.

    I get it, I have that for notebooks too. I also have it for personal websites.